How Ledger Board Attachment Works: The Most Critical Step In Deck Building
Most homeowners spend hours picking out decking materials, railing colors, and board patterns. And that's fair.
May 15, 20264.1K Shares84K Views
Most homeowners spend hours picking out decking materials, railing colors, and board patterns. And that's fair. Those things matter. But when it comes to deck building, the single most important decision happens before any of that. It's the ledger board. Get it wrong, and everything else becomes irrelevant.
What Is A Ledger Board And Why Does It Matter
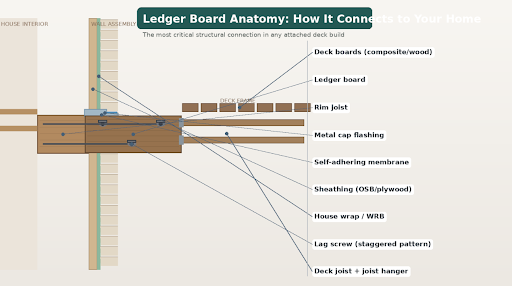
A ledger board is a horizontal piece of pressure-treated lumber that bolts directly to the rim joist (also called the band joist) of your home. One entire side of your deck rests on it. That means every person standing on your deck, every piece of furniture, every inch of snow in winter, all of that load transfers through the ledger into your house frame.
A free-standing deck doesn't use a ledger at all. It stands on its own posts and footings on all four sides. That's a fine option in certain situations. But when a deck connects to the house, the ledger becomes the backbone of the whole structure. According to the American Wood Council, a poorly attached ledger is the leading cause of deck collapses in the U.S. It's not the decking. It's not the posts. It's this one board.
What The Builder Looks At Before Attaching The Ledger
Before a single fastener goes in, a good builder spends time evaluating the wall. Here's what they're actually checking:
- ✅ Wall material. Brick, stucco, and EIFS (foam-based siding) are all problematic surfaces for ledger attachment. They require special techniques or may not be suitable at all.
- ✅ Rim joist location. The fasteners must go into the rim joist of the house frame, not just into the siding or sheathing. Attaching to siding is one of the most dangerous mistakes a builder can make.
- ✅ Height clearance. The top of the ledger needs to sit below the finished deck floor height by about the thickness of the decking board, plus 1/8 inch for flashing clearance.
- ✅ Utility lines and obstructions. Gas lines, electrical conduits, and HVAC equipment can all complicate the attachment zone.
Mistakes at this evaluation stage are the most expensive ones. Moving a ledger after the fact means pulling siding, repairing the wall, and starting over.
Flashing: The Step Most DIYers Skip
Flashing is a waterproofing layer that sits on top of the ledger and directs water away from the wall. It's either metal (Z-flashing or cap flashing) or a self-adhering membrane tape, and most professional builders use both in a redundant system.
Without flashing, water gets trapped in the gap between the ledger and the house. Wood gets wet, stays wet, and starts rotting from the inside. The scary part? You can't see it happening. By the time you notice something's wrong, the damage is often deep inside the wall.
Felt paper behind the siding also plays a role here. When installed correctly, it directs any water that gets under the siding downward and out, not into the wall cavity.
This is the single most skipped step in DIY deck projects. It's not obvious, it's not glamorous, and nobody praises you for doing it right. But skipping it eventually leads to rotted rim joists, structural damage, and very expensive repairs.
Fasteners: Lag Screws Vs. Through Bolts Vs. Structural Screws
Once flashing is in place, the ledger gets bolted to the rim joist. There are three main fastener types in use today, and each one works differently.
- ✅ Lag Screws (1/2 in.) are the most common choice. They're easy to install and widely available at any hardware store. The downside is they can strip out over time if someone over-torques them during installation, which happens more often than it should.
- ✅ Through Bolts and Carriage Bolts (1/2 in.) give you the strongest mechanical connection of the three. They pass completely through both the ledger and the rim joist, so there's no way they pull out. The catch is that installation is more difficult and requires access to the inside of the wall to tighten the nut.
- ✅ Structural Screws (WS or WSWH-rated) are the modern standard. They're fast to drive, fully code-approved, and don't require pre-drilling in most cases. They do require the correct torque and a precise staggered pattern to perform as rated.
One rule that applies to all three: every fastener must be hot-dipped galvanized or stainless steel. Pressure-treated lumber contains compounds that accelerate corrosion in standard steel hardware. Regular screws or ungalvanized bolts will start breaking down within a season or two.
Fastener spacing isn't guesswork either. It's calculated based on joist span, expected deck load, and lumber species, using tables from the IRC (International Residential Code). And here's something that surprises a lot of homeowners: more fasteners don't always mean a stronger connection. Placing too many in a straight line can actually split the ledger board and weaken the whole attachment.
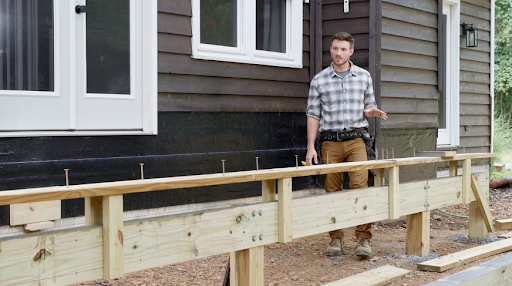
The Installation Process, Step By Step
Here's how the actual attachment goes:
- ✅ Snap a chalk line on the house wall at the correct ledger height.
- ✅ Temporarily brace the ledger in position for alignment.
- ✅ Remove the siding in the attachment area (this is required, not optional).
- ✅ Apply self-adhering flashing tape directly to the sheathing.
- ✅ Install metal cap flashing over the top edge of the ledger.
- ✅ Pre-drill 5/16 in. pilot holes (for 1/2 in. lag screws) to prevent splitting.
- ✅ Drive fasteners in a staggered pattern, not a single straight line.
- ✅ Confirm the ledger is level, then apply caulk around each fastener penetration.
The staggered pattern matters. A single row of bolts running down the center of the board creates a weak split plane. Alternating the fasteners' top and bottom distributes the load and keeps the wood intact.
Common Mistakes And What Goes Wrong
A few things that regularly show up in failed ledger connections:
- ✅ Bolting through the siding instead of into the rim joist.
- ✅ Skipping flashing entirely.
- ✅ Using regular wood screws, nails, or drywall screws.
- ✅ Fasteners in a single line instead of staggered.
- ✅ No pre-drilling, causing splits in the ledger.
- ✅ Using standard steel hardware that corrodes within a few seasons.
The consequences aren't minor. Deck collapses cause serious injuries every year, and the majority trace back to connection failures at the ledger. It's not a dramatic failure point until it suddenly is.
The Right Builder Starts Here
A ledger board is not where you want to cut corners or guess. Any contractor who doesn't bring up flashing, fastener specs, or rim joist location early in the conversation is missing the fundamentals. Before you sign anything, ask your contractor specifically how they handle ledger attachment. The answer tells you a lot about how they handle everything else.
Jump to
Latest Articles
Popular Articles